Anatomy of a Red-Team exercise - Chapter 3 - DEEP

Important note before starting: each phase is not fully detailed, the provided information here permits to illustrate the context and to provide a better understanding of this write-up, some details are missing – we apologize for this.
This article is the third chapter of a series of article that have been published on ictexpertsluxembourg.lu technical corner.
Scenario 2: Raspberry device addition
As discussed in previous scenario, we prepared several raspberry devices with a 4G modem, allowing us to remotely control the device without requiring being in proximity for operation.
During the previous recognition, we identified training rooms on a ground floor office (See Chapter2 of this blog series). As we identified that several systems where connected in these rooms, we took the opportunity to plug one of these raspberry devices in order to obtain another access to the targeted network.
This scenario was selected based on our initial physical reconnaissance with the objective being to gain an access to the network.
Raspberry is a small, low cost, and low consumption hardware based on an ARM processor that can be easily extended with electronic components and that can run Linux based operating systems. All these properties make it a very good candidate for building custom network implants that can be used in different situations where physical access is achieved to an interesting network.
To achieve such needs, we built a custom Raspberry setup with the following objectives in mind:
- Being able to remotely access to the Raspberry device, even when plugged in isolated networks or to air-gaped systems. This is achieved by using a 4G modem with a VPN connection to our command and control systems;
- Being fully passive by default and not generate unwanted traffic to avoid being detected or blocked by network level access controls before being able to obtain useful information;
- Supporting multiple network configuration in order to fit with potential use cases (plugged in server rooms, on mixed VoIP LANs, on networks with access controls) and flexible enough to profit from potential switch configuration errors;
- Supporting physical man in the middle setups allowing to spoof a victim’s device, as this would allow to bypass more complex setups with IP filtering or Network Access Control (NAC/802.1x) without impacting the connectivity of the victim device.
The Raspberry device being small, it can also be disguised into a generic network device by creating a custom enclosure.
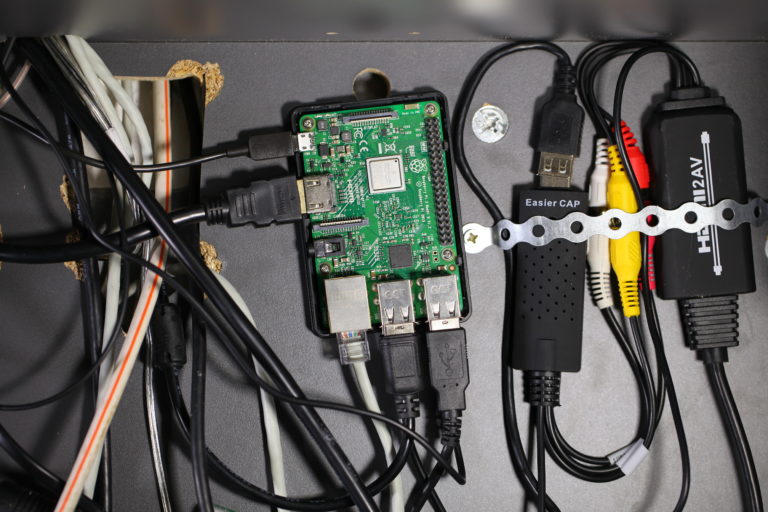
Out of laziness and because we wanted to make it look like a raw electronic device, we choose to profit from the look of the raspberry 4G electronic board that has been added to the Raspberry device and keep it open, with a band antenna.
As it can raise suspicion, sticking a note that says “! Always keep this device powered on!” on the front of the device will slightly hide the raw electronic components and will cause the paradox effect to make the presence of such device more legitimate (because it looks fragile).
After accessing to one of the training room, the first action was to power the Raspberry device up and try to plug it to a free network patch:
No traffic was observed on the network plug and time was limited, we choose to connect it in a man in the middle position, which means physically between a Laptop present in the training room and its network patch, while hiding the Raspberry device inside the trap door.
Passive network attacks
From this point, network traffic could be observed and usage of Network Access Control (NAC) has been quickly identified based on 802.1X radius authentication (using the EAP protocol).
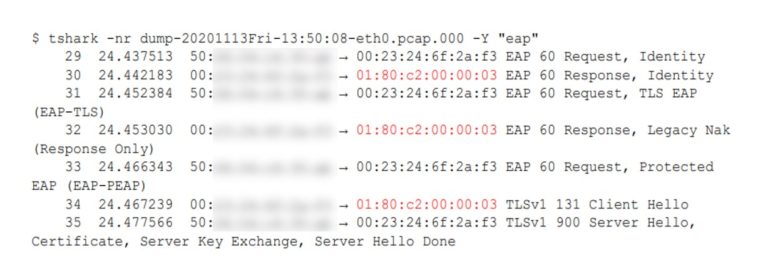
With NAC being active on the switch, there is chance that generating traffic without proper authentication would raise an alert or even shutdown the switch port. As the Raspberry device was already in place, remotely controlled, and connected to a functional network, the best action in this scenario is to passively monitor the victim network traffic for several days instead of generating network traffic and risking being caught (plus we already had another functional access to the target network at this time).
The Raspberry device uses two network interfaces configured as a bridge (like a switch), allowing to let transparently pass layer 2 traffic. The only restriction is caused by the Linux kernel that blocks IEEE 802.1d reserved addresses that are used for 802.1x NAC. To do this, it is necessary to configure a Mask in order to let pass IEEE 802.1d multicast MAC addresses [1], more specifically the EAP MAC address 01-80-C2-00-00-03:

Thanks to this configuration, the victim system was able properly authenticate on the network. [1]
Looking for targets
Of course, a packet sniffer has been started up as soon as the device was plugged in. After waiting for less than one day, a first analysis of the network traffic has been performed directly on the device using scripts based on the tool tshark (we want to perform analysis locally without having to download all PCAP from a 4G network – especially when the signal is bad).
- Running tshark IP statistics allowed discovering commonly used internal systems IP addresses and some network ranges:

- Looking for multicast traffic disclose several host-names, especially windows clients or servers broadcasting on the same network than the victim:

Looking for passwords
Discovery usable credentials at this point would be very useful for the other attack scenarios. This can be achieved using more advanced tshark commands or using dedicated tools:
- Looking for clear text passwords or HTTP passwords can be interesting:

- Similarly, some passwords could be disclosed in HTML forms that are submitted unencrypted (over HTTP).
- If no clear text passwords can be found, NetNTLM authentication handshakes can be retrieved and would allow trying cracking passwords, if such password is weak enough. The following command allow retrieving all these handshakes in json with sufficient information to attempt cracking the passwords used to “sign” these handshakes, and supports most network protocols used for NetNTLM authentication:

The first observation after one day of network sniffing is that the victim performs NTLM handshakes every time a web site is visited. This is because the web proxy requires authentication for each single page, and because the proxy authentication is performed during the HTTP CONNECT tunnelling request, this request occurring in clear text and disclosing the NetNTLM handshake.
This allowed retrieving authentication handshakes from several connections summarized below:
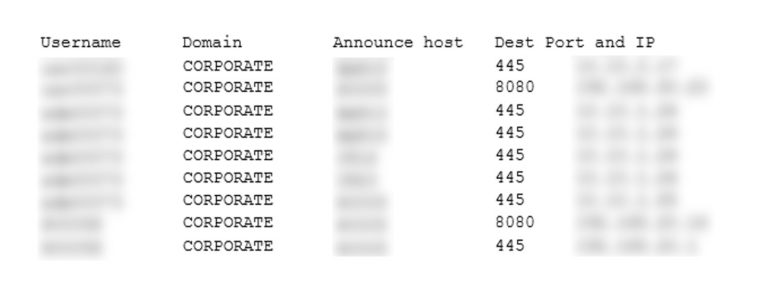
The logic behind these users is interesting as apparently, the same user id 73 is used either for a non- privileged user (starting with usr) or for a privileged user (starting with adm). This is common in IT environment to avoid using privileged users to access to emails or usual corporate resources.
The authentication handshakes for these accounts have been extracted in order to be cracked with known or leaked password dictionaries without success.
In a second step, a more intelligent cracking session has been started based on password patterns however testing simple patterns had not been successful, even when running our GPU rig for several days, until we discovered some password patterns used by employees.
Looking for files
Windows file shares are heavily used in most companies, either for IT reasons, or for corporate file exchange or archiving.
Since the last 20 years, IT security companies recommended not using clear text protocols as it easily leaks information to parties that are capable of intercepting network traffic. This is however rarely the case for the windows file share protocol for which communications are rarely encrypted, opening a great opportunity in the current situation.
First, it allowed discovering a lot of files related to windows Group Policies, as these files are exchanged with the Domain Controller regularly. This included files containing passwords such as user creation policies:
This password could be decoded and was linked to an IT provider, with the potential of such password to be used somewhere else in the network or on other networks managed by the same IT provider.
It was based on a pattern that could also be used to potentially crack other passwords:
Of course, other files where obtained at this point, including confidential documents and financial data extracts (Excel files…) that were used by the victim desktop account usr00073 and that could be ex-filtrated directly from the 4G network, with no opportunity for being detected.
Perseverance
Following this discovery, we decided to continue sniffing traffic up to a full week while other attack scenarios where running.
Several days after the initial analysis, the whole windows profile of the user usr00073 was synchronized, because the user was configured to use a remote profile. Again, this leaked a lot of configuration files that were used by windows application, including Firefox profiles.
The following files names could be observed during the windows profile synchronization, showing synchronization of two Firefox profiles:

The logins.json file contains credentials that are encrypted using a key stored in key4.db and optionally a master passphrase; however, a limit of Firefox is that it does not automatically request the creation of such passphrase.
The key4.db file is a SQLite database and recovering it has been hard because lot of packets have been lost due to performance issues of the raspberry pi device, especially when the whole user remote profile was synchronizing (we suggest interested readers to check the buffer size when they run tcpdump and to monitor dropped packet by sending regularly the signal SIGUSR1 to tcpdump).
Nevertheless, it has been possible to reconstruct one of the key4.db SQLite file with only 3 out of 4 chunks by replacing the missing chunk with null bytes. This profile only contained one web account while the second one contained dozens of accounts:
At this point, there is no guaranties that this web account is using the same password than the user domain account, however in our experience that is often the case either because of usage of domain authentication delegation (the web site authenticates users by connecting to the Active Directory LDAP), or because of users are reusing their passwords on multiple services of the company (sometimes even on web services outside the company).
Password cracking again
As some passwords have been gathered, interesting password patterns could be derived to try cracking again of the authentication handshakes that have been obtained.
Passwords often follow similar pattern caused by user habits of generating a password only to match the password policy, in our case:
- A name starting with uppercase
- An optional special character
- A date
- An optional special character
The following password cracking session shows that such passwords could be recovered in less than 1 minute with good hardware and a good name dictionary: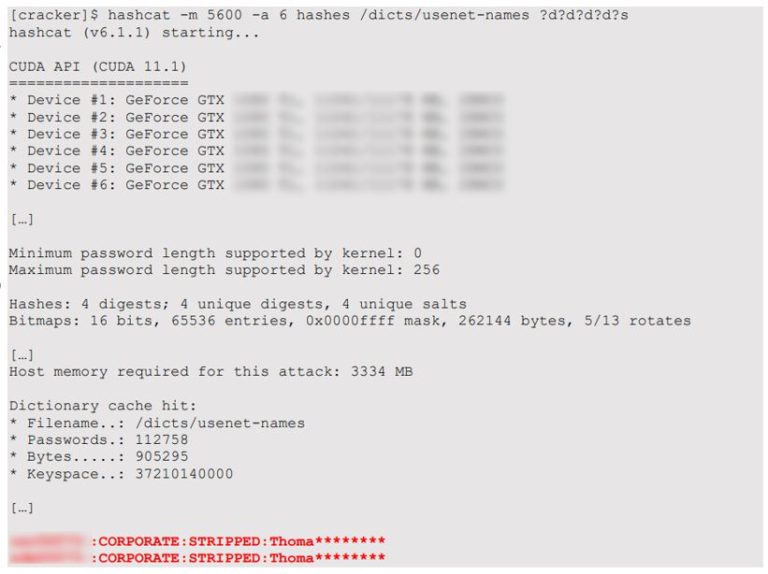
Using password cracking in this case succeeded but was useless as the obtained passwords could have been added to a dictionary directly anyway. This is a bad habit of using pure power instead of more human neurons.
At this point, and without generating any traffic on the network, we obtained two passwords, and proved that one of them is valid for a user account that is apparently privileged on the windows domain.
This also showed that password reuse habits can break security domain paradigms, because the password leaked from one low risk domain is sufficient for an attacker to access to a higher risk domain.
Active network attacks
Up to this point, only passive activities have been performed on the Raspberry PI device ensuring that our activities could not be discovered. Continuing the intrusion process however requires to gain an access to the network.
Accessing to the network however requires discovering a valid IP address and bypassing NAC. This is possible by spoofing the training room Laptop network addresses because our Raspberry system is connected in-between this laptop and the network.
Blindly spoofing network addresses can often cause network interruption for the victim laptop. To avoid being noticed because of network interruptions, we followed a strategy defined in a DEFCON- 19 paper in 2011.
This strategy consists of:
- Using a bridge and configuring properly the Linux kernel to let pass through EAP packets (which has been presented earlier);
- Spoofing the victim MAC using a POSTROUTING rule with EBTables;
- Spoofing the victim IP using an IPTables Source NAT address translation;
- Forcefully registering the router MAC address in the ARP tables, and manually creating a route for the proper local network IP range (because we spoof the IP address of the victim, the Linux system does not actually know that he can route traffic to the local victim IP range, nor know the local gateway).
- Eventually adding routes to route traffic to other networks of the company (do not blindly create a default route at it can break the access to our command and control server which is using the default route of the 4G modem).
Scripts have been written for each of these steps in order to keep fine-grained control of the spoofing setup. However, the hardest part is often discovering first the network environment and especially:
- The IP and MAC address of the victim
- The IP and MAC address of the router
- The victim network IP range
- Potential DNS servers addresses that in use
The easiest way for this discovery is to build a list of IP/MAC mapping of the hosts that have been observed in network traffic and to perform an analysis based on following facts:
- The most frequent traffic is often between the IP address of the victim laptop and the MAC of the router
- The MAC addresses are different for each system of the local network, allowing to identify the size of the local network
- All packets toward IPs of the other networks are using the router MAC address
The final setup for spoofing was the following:

These variables being reviewed allowed to run the different spoofing scripts. This setup has been validated to work properly (including DNS) by trying to get the proxy.pac file from the raspberry device (which also allow discovering common web usages of the company):

From this point, it was possible to access to the company network using the Raspberry Device, while spoofing the victim MAC and IP address.
We could at this point also start using credentials of the user identified before, however we decided instead to use credentials obtained during the Scenario 4.
During mission closure, the training room laptop has been considered as compromised by the blue team because connections using a forest administrator have been observed from this laptop. This laptop has been consequently removed from the network.
However, the Raspberry device had not been found during the blue team intervention, meaning that we could still remotely access to the device, but lost access to the network because no victim was there to be spoofed, while doing the NAC authentication for us.
We consequently decided to wait until the victim or another laptop is connected to the network cable, however we quickly reached the end of the Red Team mission. We finally disclosed the fact that the training room laptop was not compromised, but that a Raspberry device was used to access to the network directly.
Scenario 3: Targeted Phishing (simulated)
As said in the previous chapter, phishing campaign were excluded from this exercise as defined in the pre-engagement part.
However, since this attack vector represent a large entry point that is actively exploited in the wild, POST Red Team recommended to, at minimum, simulate a successfully executed campaign in order to assess the whole chain and to cover the risk in the best ways and bring more added value to this exercise by challenging:
- E-mail gateway filtering effectiveness;
- Capability for an attacker to perform code execution on a standard workstation (hardening);
- AV/EDR solution limits;
- Capability for the executed malicious code to connect to internet through the web gateway policies (proxy);
- Alerting and in case of alert, reactions and processes in place – incident response;
- Risk exposure for CLIENT being compromise from this attack vector.
As described in the chapter 2, we already created a customized PowerShell stage less reverse HTTPS payload bypassing Sophos AV and AMSI. We combined it with HTA for delivery purpose and sent an email to our victim containing the malicious link to our website.
The targeted victim clicked on the link, which opened our website using Microsoft Edge web browser. Based on a basic JS finger printing script, using Edge or IE the victim is redirected to our HTML page which deliver the .HTA script to execute. As we can see in the below web server logs screenshot, the victim visited the page, opened the HTA, which got executed as the PowerShell payload has been downloaded. Then, we can see request on “/cs/jsquery”, meaning our PowerShell payload got successfully executed and is connecting back to our C&C server:

Figure 1 Dropper and payload successfully executed
We now have our remote shell opened on the victim machine:

From this point, we can start post-exploitation phase, by discovering and enumerating the network.
We first started to enumerate domain information, such as users, computers and groups in order to identify interesting servers and domain admin or enterprise admin users to target. Then, we searched for interesting folders and files on the host we were connected to, in order to harvest for files that could contain some passwords, including browsers databases. Having a session from a domain user, we could easily access network resources.
We quickly identify very few domain admin users, and only one enterprise admin account. We also found several KeePass files that let us think that this company was using KeePass as main passwords manager software. If the user is using KeePass master password instead of using a key file to protect KeePass database files, the master password may be stored into KeePass configuration files.
Therefore, we used Cobalt Strike’s harmj0y aggressor scripts to harvest for master password information. As a result, we could find user’s KeePass database password in clear text:???????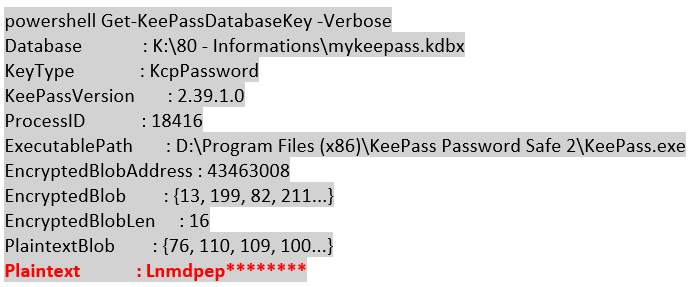
From this KeePass database file, admin account for “Password Manager Pro” (PMP) software could be found. After configuring Cobalt Strike’s socks tunnel, we could access it as admin, and access all servers’ administrator passwords, including the domain controller one along with the enterprise admin user’s password.
We could then successfully connect to Domain Controller using enterprise admin account, and access all data stored on file servers… game over!
Flag: Obtain “enterprise admin” privileges within the corporate network completed!
Scenario 4: Physical intrusion on Head Quarters (servers’ room)
The last flag was the intrusion into the datacentre. Our fear of learning that our client’s DC could have been a Tier 3 or Tier 4 was quickly dispelled when we found an article online explaining that this one had recently been moved to our client’s headquarters.
With this information, we went to the premises of our client in order to try to identify is location into the building. We focus on the lower floors because very often the technical rooms are on these levels, for technical reasons (lower temperature in the basement, ease of moving rack in the lower floors, space saving for offices on the upper floor…) moreover, we had already visited the upper floors when we recovered the previous flag, these seemed only filled with offices, the technical rooms could not be big enough to accommodate a datacentre.
During our visit we identified several technical rooms to the different basement. Compared to the configuration of the building we had identified only three technical rooms large enough to host a datacentre.
After some reconnaissance phases we went on site with a simple door slamming tool. By experience we know that in the majority of the cases for a question of practicality the exit of a technical room does not require usage of an access card.

Figure 2 – Door opening slammed from below
During our recognition sessions, among the three technical rooms that we had located, one of them seemed to be more supervised than the others with a camera that pointed directly at the door.
However, in order to put our theory into practice, we tested it on one of the less monitored technical location. After a few seconds we managed to open the door allowing us access to this room and thus validated our POC.
After this validation, we went back to the technical room that we had initially targeted to verify if our intuition was right about the location of the DC. So, we came back to this door and once again we tried to open it with our tool, this time under the surveillance of a camera that pointed directly at the door.???????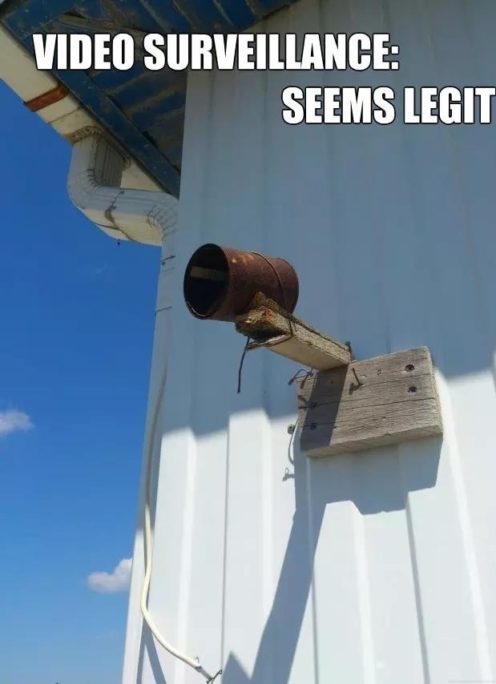
After a few seconds, we were able to open the door.
Once through the first door we arrived on a corridor leading to another door. The sound of ventilation coming from this second door and the register next to it containing the names, dates and times of visits led us to believe that we were in the right place. We repeated with our tool the procedure to open the door in order to try to access the DC. Once again after a few moments we could open the door and arrive directly in the server room.
Once in the room the flag was obtained however a last room seemed interesting, all the cables of the different bays end in this room. Once again, we opened this door with the same tool and managed to access the customer backbone.
Figure 6 – Datacentre
We decided to plug one raspberry device in this server room, we didn’t have any difficulty to open the rack because many keys were available. The locks on the racks are standard if they are not changed individually, only one key can open them all.

Figure 7 – Key rack open
It’s important to note that this device was plugged to validate the flag but no interaction was made with it, first because of the sensitivity of the equipment on which it was plugged, but also because all the flags had already been validated beforehand.
Flag: “Access Data Centre and plug malicious device into servers’ room” completed!???????
Conclusion:
As a conclusion, where customer often think that Head Quarter, Data Centre and server’s room are secured because they are located inside buildings, being protected by camera and access cards, we however successfully achieved 3 over 4 flags listed below:
- Flag 1: I.T security related objective [COMPLETED]
- Obtain “Enterprise Admin” privileges within the corporate network;
- Flag 3: Complete scenario: [COMPLETED]
- Identify the members of the Board of Directors;
- Identify the location of their office;
- Enter the office;
- Access and/or exfiltrate a confidential document;
- Flag 4: Complete scenario [COMPLETED]
- Enter the main data centre;
- Enter the area of the racks with servers;
- Drop malicious device to prove persistence capabilities and to access data within the infrastructure without being detected.
Contact us
Do you have any questions about an article? Do you need help solving your IT issues?
Contact an expert


Our experts answer your questions
Do you have any questions about an article? Do you need help solving your IT issues?

